Showing posts with label new product. Show all posts

Friday, April 20, 2012

{Friday Fun} with Heart Basket

Pin It

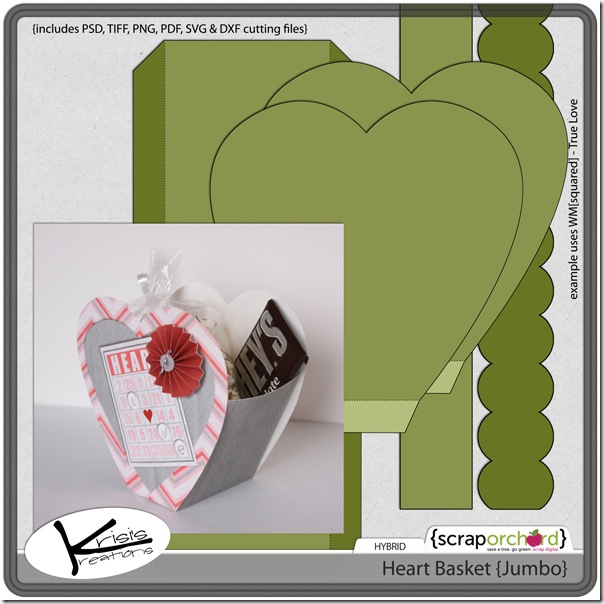
The girls had a fun time playing with this heart basket. I was featured at Scrap n’ Art back in February and this was the template they received with their subscription. But this isn’t only good for Valentine’s – it would be perfect as an apple for Teacher Appreciation, or filled with goodies for Mother’s Day.

Take a look at what the girls created:

Cathy
heart_cathy

Lori
heart_lori

Sara
heart_sara


And the template for you to see up close:

kk_heartbasket_jumbo_preview

Pin It

Tuesday, February 28, 2012

{Wacky Wednesday} Happy Leap Day, giveaways & early releases

Pin It

Some interesting Leap Day facts (courtesy of examiner.com)

The following fun facts about leap year were collected from Leapyearday.com and Womens-Place.com:

  1. Your chances of being born on a leap day are approximately 1 in 1500.
  2. There are about 187,000 people in the US and 4 million people in the world who were born on Leap Day.
  3. People born on Leap Day are called leaplings.
  4. In most states, leaplings must wait until March 1st to be eligible for any age-specific privileges (ages 16, 18, 21).
  5. Every now and then we have to skip a regularly scheduled leap year. This happens during specific century years.
  6. Century years are not leap years unless they can be evenly divided by 400. The years 1700, 1800 and 1900 were not leap years, but 1600 and 2000 were.
  7. When 2/29 is entered into a majority of websites it comes up as an invalid birth date.
  8. US Presidential elections and Summer Olympic Games are both held every four years and occur during leap years.
  9. In Greece, people believe it is bad luck to get married in a leap year. On the other hand, in Ireland, women can propose to a man.
  10. The next February 29th will come around again in 1,460 days.

Have any fun facts to share… or is today your birthday?


Head over to the Scrap Orchard blog to win my messy memories subway art or head to Wild Blueberry Ink to win a Cansolidator Pantry from Shelf Reliance. While over at Wild Blueberry Ink check out her Project Life freebies as well.


Leap day is here!  For one day only the new releases in the Market are 29% off.  I have two new items for you…

Create It {Leaves & Stems} by Krisi's Kreations


Create It {Flowers v.1} by Krisi's Kreations

Leap on over and grab them now.

I have to share this HUGE collection that Chelle’s Creations is releasing this week … and it is on sale for Leap Day as well.  You should see some of the layouts coming out of this collection – plus is is a great stash builder – use these to supplement kits you already have.  It is nearly 50% off with the bundle discount and the new release sale – grab it today!

Pin It

Friday, February 17, 2012

{Friday Fun}

Pin It

The girls had so much fun working with this weeks template (Jr. Legal Pad Cover) I just had to show off the projects they created!

sharon
Sharon

leann
LeAnn

Jude
Jude – taking with her to DigiScrapApalooza – come!!!! use KRISISENTME to save $$$

legal_melanie
Melanie

legal_karen
Karen

and mine.


Jr. Legal Pad Cover by Krisi's Kreations
Bug Catcher from Chelle's Creations

And here is the template they used:

Pin It

Thursday, February 16, 2012

{Tutorial Thursday} Jr. Legal Pad

Pin It

It's Thursday and time for another tutorial!  It's Cathy here posting (Scrappycath) and I'm going to be showing you a project using the Jr. Legal Pad Cover released this week at Krisi's shop.

I'm also going to share a bonus tutorial on how to use templates with the Silhouette electronic cutter, even though there may be no cutting files!!


I used the digital kit Boy in Blue Jeans by Jady Day Studio. You don't have to use digital papers with Krisi's templates. She includes .pdf versions which you can trace onto "real" paper to create wonderful projects too. Lots of possibilities!

I wanted the papers that I used to be "double-sided" with patterned papers on both sides. So first I chose a digital paper from the kit to be the inside of my pad cover. I chose the large circle paper.  I then printed that on to one side of  two letter sized (8.5'x11") sheets of paper.  I have an inkjet printer and I used a paper by Red River called Polar White. It's a bit heavier than presentation paper, but displays the colors well, like presentation papers.

I then opened the .tif templates in Photoshop CS4 (the templates come in multiple file formats to work with all sorts of photo editing programs or just print the .pdf version to trace onto paper!). I clipped the digi papers that I selected to the appropriate areas of the templates: front, back, pad cover, and pocket.  I chose to use the scallop edge flap (turn off the template sections that you do not need). Also be certain to delete or turn off any instructional text layers, and reduce the opacity of the score lines.

Keep in mind that the right most edge of the front will be covered by the flap when it is closed.  If you want to see your embellishments when the flap is closed, keep them about 1.5" from the right edge of the front section.

At this point, you can print out the designed templates, cut them and move on to the scoring and assembling.  BUT, if you have a Silhouette electronic cutter, I've got a big tip for you.

Creating Print-and-Cuts for the Silhouette:
Here is what I do when I want to print-and-cut something on my Silhouette. In Photoshop, I merge all of the layers to create one layer for the item that can be printed and cut. Above is the image of my front design. I save this as a .jpg file and named it FrontPRINT.jpg.

I then add a layer above the design one in Photoshop. I fill that layer with black and clip it to my design layer.
This creates a black image of what I want to cut in the Silhouette software. I save this as a.jpg and named it FrontCUT.jpg. (Note: I have the Silhouette SD, not the Cameo, it has a smaller cutting area. I had to create separate files for the front and the pad cover)

Now open the Silhouette software. Open the PRINT file that you created, and then open the CUT file and line it up on top of the PRINT file. Hint: use the "centralize" tool to line them up exactly.  Turn on the registration marks, and be certain that your design is lined up inside them.

Select the Trace tool. Click and drag to select the design. When you have the design highlighted click "trace outer edge" (for this design we only need cut the outline, for more intricate designs, you'll want to select "trace" to trace outside and inside edges). Once you have the cut lines traced, you can drag the black "cut" file off the work space.  The project in your Silhouette software will look like the image above.

Now, using the Silhouette software, send it to the Silhouette, select to print it. I printed mine on the opposite side of the paper I had already printed on.
Once it has printed, with the registration marks, place it on your Silhouette mat and insert it into the Silhouette. On the software, select to continue and detect the registration marks automatically. Then cut your page!

Scoring and Assembling:
Once you have your design printed and cut, you are ready to score and assemble it.

Using a scoring board is really helpful to get a straight line. If you don't have a score board, I suggest placing your paper on top pf a magazine or on the back of a firm mouse pad or other thin foam mat. Then place a straight edge ruler along the score line, and use the back of a butter knife (not the cutting edge) to score the paper.


Add adhesive to the appropriate flaps and construct your pad cover.
This is how the project will look once the front and back are adhered.  Wrap the pad cover over the top of a junior size legal pad and adhere in place.  Place some adhesive on the back of the pad and adhere it to the inside back of the cover.

 Here are some images of the completed project.


I always keep a note pad at my desk to write down important things that I need to remember, to-do items, things my son says that I just don't want to forget. Now instead of a loose pad and pencil, I have a pretty packaged pad to help me keep my notes!

I hope you have fun creating a pretty covered pad too. By the way.....These would make great teacher gifts!!

Cathy (scrappycath)

Pin It

Tuesday, February 14, 2012

{Project Life} Week 6 & Digi Link Up

Pin It

Happy Valentine’s Day!  Sorry I didn’t post on Friday or Monday – it skipped my mind that it was my turn to post!  I do have my new products that came out this past week down below for you to see though!

Each year I think I am going to have a grand plan and do all kinds of fun things for the kids and hubby but I never do! I did get them a few presents (clothes for the girls & coupons for dad) but that is as far as I went.

Have been to work 3 times – I survived!  Actually it was quite enjoyable, my patience was much better and I really felt like I was able to make a difference.

Now onto why you are here – Project Life. I just love seeing everyone’s pages – a little peek into your life! I didn’t get started early this week, I did it tonight – but I love the collage pictures I added in. They are templates from Designs by Lili (I could have created them myself but decided it would just be easier to buy them – since this project is all about making memory keeping easier (and it totally has made it easier).  The papers are from Chelle’s Creations – What a Hoot kit and the fonts are Veteran’s Typewriter, SMD Niki & my own handwriting.

Here are my pages – kept pretty simple this week (well I usually do but these seem even more simple than usual):

wk6a_webwk6b_web2

wk6a_web

wk6b_web2

Did you include something about Whitney Houston on your pages? We grew up listening to her music – and was tragic news to hear of her death.

Linking up with:  www.themomcreative.com and http://www.one-happy-mama.com/

Link your digital pages here:


A hybrid template – simply clip your papers to the template – print and assemble.


and this paper pack:

Pin It

Thursday, January 26, 2012

{Tutorial Thursday} Pillow Door Hanger and Accordion Flowers!

Pin It

Hello, there! LeAnn, here.
Today is a tutorial on using a couple of Krisi's products together:

Accordion Flowers:


and the Pillow Door Hanger:


For this project I used the "She's All That" kit from Jady Day Studio.
Her designs can also be found at Scrap Orchard.


After I clipped the papers to Krisi's template and printed, here's what I had gathered:


Next, I scored the fold lines with my bone scoring tool. Then, I cut out the pieces and folded along the score lines. I accordion folded the strips for the flowers and glued the strips together for the larger flowers. For a detailed tutorial on assembling the accordion flowers see this post HERE.


Then I glued the piece called the "back" to the inside of the hanger.


Next I folded the pillow over and glued the flap closed, as well as folding up the bottom and gluing that. The hanger part is now done!

Next up, finishing the flowers. First I glued the ends of the accordion strips together to form a circle. After they dry, I like to cut circles out of scrap paper and use hot glue to hold the flattened-out flowers together. No one will see the backside, anyway, right? :)


After gluing some buttons in the center front of the flowers and paper strips to the back, I arranged them in the pocket of the door hanger. Its a pocket full of posies!

You could get creative with what you use for the center.
How about candies? (You might even find a way to have them remain edible!) You could also attach pipe-cleaners to make stems, or even rolled paper. Get creative!

My favorite configuration, however, was when I used one of the smallest flowers as the center of the flower on the pocket, and filled the pocket with kisses! Yum! :)
Lots of ways to create, and you don't even have to end with what you started out to create! :)


Hope you enjoy working with these products!
LeAnn

Pin It

Thursday, January 19, 2012

{Friday Fun} Cards, Flowers & Wall Art

Pin It

The girls on my team had fun creating this week!   Four of the girls are participating in the Rumble in the Orchard challenge. Here is their finished project:

Rumble-1-Comp

Cards that have a rainbow effect to them – each girl created a different card (and they are spread across the US and one in China!). They did great – head over and vote for them HERE (Krisi’s Kreators).

And some other projects they did:

Badges were a fun thing with the accordion flowers!

LeAnn:
accordion_leann

Tamara:
accordion_tamara

Sarah:
accordion_sarah

But they are great for cards too:

Rebecca:
accordion_rebecca

And… some wall art.

Jen:
abc_jen

Tamara – who did a girl and a boy version.
abc_tamaraabc_tamara_girl

Jennifer (who shrunk the wall art down and made it into a card):
abc_jennifer

Here are the products that they played with this week:


Are you considering going to DigiScrapApalooza? I know I am headed to Vegas in March. Come join me!  Use this code to save $20 – KRISISENTME   If you have questions… just send me an email.

Pin It