Sunday, April 1, 2012

Birthday Card Challenge @ScrapOrchard & Reminders

Pin It

Create a birthday card (or spring/Easter would work too) and show it off in the gallery as well as post back to this thread. Everyone who completes a card by Tuesday 12pm noon EST will be entered to win a $10 gift card to my store. Don't forget that most of the Market is on sale for 35% off (including all my hybrid goodies)

*Includes two word arts - similar - to use if you want -- you do NOT have to use them*
Download the template: http://www.4shared.com/zip/pyjZKrUf/..._cardtemp.html

BONUS - Purchase a template from my store and create a matching project to go with your card - then you will get a coupon to spend that same amount in my store on another template!!! That is like saving an additional 50% off.

And a couple reminders – if you have not changed the batteries in your smoke detectors – change them. If you have not rotated the food (unless it is THRIVE) in your 72 hour kits rotate it (or you don’t have one – get one). And if you have not backed up your computer lately – DO IT!

Pin It

Tuesday, March 27, 2012

{Project Life} Week 12 & Digital Link Up

Pin It

What a week I have had… it was so fun!  Spending 5 days in Las Vegas with the friends that “live” in my computer was amazing and tiring!  I am hoping to have my pages done tomorrow evening but wanted to get this post up for anyone who is on top of things and ready to link up already!

Pin It

Thursday, March 22, 2012

{Thursday Tutorial} Working With Digital Stamps

Pin It

Hello, Cathy (scrappycath) here to share a little tip for working with digital stamps.  Krisi has a great set of Spring related sentiments called Write It: Spring Sentiments Digital Stamps in her shop. You can add dimension to your stamps by adding color.

I'm going to show you one way to add several colors to your digital stamps in Photoshop (or elements). As usual, there's always more than one way to do things in PS/PSE. So if you have a favorite way, by all means go ahead and use it!


First, you'll select the sentiment and open that file in Photoshop.  I'm using the "lucky me I have you" sentiment. Duplicate the layer and turn off the original layer.  Working on the copy layer, use the Polygonal Lasso Tool (circled in red in the image above), to draw around the part of the sentiment that you want to separate so that you can recolor it. When you've completely surrounded the item, you'll get those "marching ants" outlining it on your screen. You can see that I've outlined the "lucky me".  From the menu choose Select > Save Selection and give it a name.  Then press Ctrl+J. This will duplicate the selection onto it's own layer.


Click on the copy layer of the sentiment to make it active, then from the menu choose Select > Load > and choose the name of the selection you just saved. This will reload the original item you encircled. Press delete to remove it. Now you have the "lucky me" and the "I have you" on separate layers.


You can add a layer above each of these and clip papers from the kit you are using to recolor them. Or you can simply fill those layers with colors and clip them.  To clip a layer to the digital stamp layers, place the layer of paper or color above the digital stamp layer, then hover the mouse between the 2 layers, press Alt+click. this will clip the top layer to the one underneath.

I used papers from the digital kit that I was working with Lucky Me by Elise's Pieces, to color coordinate the sentiment with the card I created.

Here is a closer look at the sentiment.

If you want to keep a copy of the altered sentiment, be certain to choose File > Save As and save it as a layered .psd or .tif file. Be certain not to save it over the original digital stamp file.

Have fun coloring your digital stamps!

Cathy

Pin It

Tuesday, March 20, 2012

{Project Life} Week 11–Digital Link Up

Pin It


Well I finally got last weeks pages done – late Sunday night (well really early Monday morning). I managed to get this weeks finished tonight as well. I need to do more journaling for the second page but I will update that later.  I leave on Wednesday morning headed to Las Vegas for DigiScrapApalooza – a digital scrapbooking convention!  I am so excited to meet other designers and scrappers – plus the kids and hubby are staying home!

And this is what my pages look  like this week. I am still having an internal debate about how I am going to get these printed.  I have noticed that my pages are getting more and more simple – but that is ok with me – the moments and memories are documented which is the important part!

wk11a-webwk11b-web

And a little bit closer up…

wk11a-web

wk11b-web
{that polka dot spot has pictures in it on the final but they are pictures of things I created for Vegas… so since no one has seen them yet I can’t share!}

Kit is from M. Martin – Geek Chic from The Digi Files # 33

Valerie Wibbins – Pocket Pages No. 3

Link up your pages here – please link back to here in your post and spread the word to other digital scrappers!


Linking up to

The Mom Creative

and

Sig

Pin It

Friday, March 16, 2012

{Friday Fun} Egg Baskets

Pin It

Krisi has a fun new template out this week just in time for Spring. There are two different sizes of egg-shaped baskets included in this template set. Here are a few examples:

From Cathy:


From Jennifer:


Here is the template we used:

Pin It

Thursday, March 15, 2012

{Thursday Tutorial} Shaped Cards: Spring

Pin It

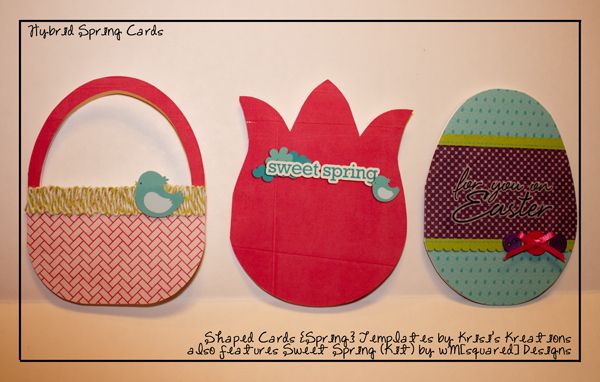
Hi -- Heather (isaacsmom) here. Today I'm going to share with you how to make some fabulous spring cards with one of the fun products that Krisi released last week at Scrap Orchard: Shaped Cards {Spring}. You can find it in the store here.

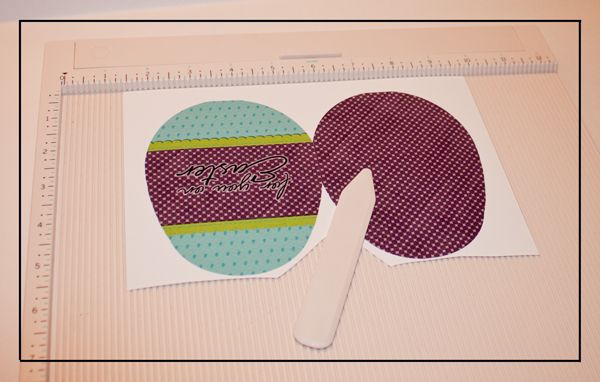
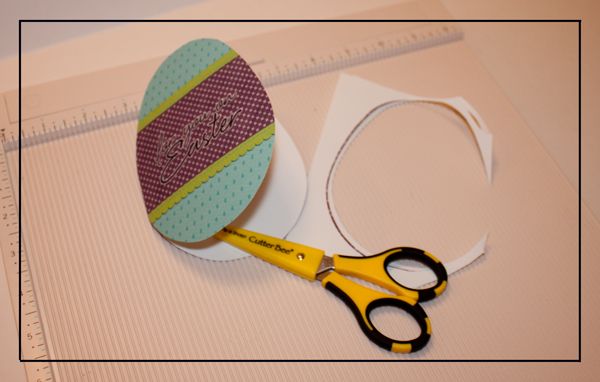
So first off, you choose which one of the cards you want to make, and open the file in your editing program -- I use PSE 10. This template comes in several file forms to suit lots of different needs. For this project, I used the .tiff file. I opened the digital papers I wanted to use and decorated the template. For the egg shaped card, I used the greeting "for you on Easter" which can be found in Krisi's pack of Write It: Spring Sentiments found here. Once I had the templates decorated in my photo editing program, I went ahead and printed them out. The next step is to cut them out. One of the things I found to be helpful with these shaped cards, was to actually score and fold my card before I started actually cutting out the shape. This helped the cutting process go quicker as well.


I always use my Cutter Bee scissors when cutting out my hybrid items. I love how sharp it is and also with the small blade, I can get into the little corners easier.

Once all of my cards were cut out, now we are ready for the fun part -- the embellishment. You will see in my examples shown below, I used several different items to finish off my cards. The first one here - the basket shaped card, I used some red line tape (double-sided very sticky tape) and made one stripe of the tape across the front of my card.

Then, I removed the red part of the tape to expose the other side of the sticky tape. I then took bakers twine and weaved a row of twine back and forth all along the strip of tape to create an effect of grass in the basket.
When I was finished, I used a glue dot to glue on a little digital bird that I had also printed and cut out. It really adds dimension to your card when you create things in layers like this. So, I have the printed card, the layer of bakers twine, and then the little birdie on top.

Here are two examples of basket cards I created: On the second one, I put a strip of ribbon around the whole card and then on the inside, I glued cut out Easter eggs so it looks like the basket is filled with eggs when the card is closed.

Next, I used the egg-shaped card template and decorated, printed and cut per the above instructions. On this card, I used glue dots to glue on 3 buttons. Then I added a tiny bow tied out of the ribbon you see here. It is just a very basic narrow ribbon.

As you can see, adding just these few items adds a lot of dimension.

And here is my finished set of cards. Spring is my absolute favorite time of year. I love the fun colors and the awakening of life all around as the cold days of winter pass. I can't wait to send these cards to my friends and family -- I am sure they will brighten their day!
All of the above examples were created using the digital kit Sweet Spring by WM[squared] Designs.

I'd love to see what you create using these Shaped Cards: {Spring} templates. Feel free to link me up in the comments section. Happy spring and have fun creating with these awesome card templates!

Heather (isaacsmom)

Pin It

Tuesday, March 13, 2012

{Project Life} Week 10 & Digital Link-Up

Pin It

Well life was a bit chaotic this past week and I worked Sat, Sun & Monday – which means… my pages are not done. I am going to take it all in stride and work on them later today.  I know the next few weeks will be a bit crazy and my pages won’t be done right on time but regardless I am keeping up with this project and LOVING the results. I can’t wait to get my pages printed. I want to do a photo book but am itching to have these printed for the girls to be looking at so I might decide to go with a post bound album. How are you doing your pages?

I will be back with my pages but wanted to have the digital link up and ready for those who stop by the site early on Tuesdays.  Please link back on your site so that others can see all the great digital pages created.

Finally made it back with my pages – this past week has been crazy!

wk10a-web wk10b-web

wk10a-web

wk10b-web

Valorie Wibbins – Pocket Pages no. 3

Weeds & Wildflowers – EveryDayLife – from The Daily Digi digi files #27

Font – My Own Handwriting & Veteran Typewriter


Linking up to

The Mom Creative

and

Pin It