Hey everyone! Karen here with a tutorial on how to make a beautiful Ornament with Krisi's
Tabbed Ornament Template.

I love to use the circle template with the center triangle. You can put it together in several ways, the simplest version would need 4 circles. And that was the one I put together when I got the template first without any idea what could be made out of it. Then I got the tip that you would need 20 circles to put together a ball shaped ornament and I was intrigued...and had loads of fun seeing it grow for the first time. Don't feel intimidated by the number of parts you need to put it together. The part that always takes me longest is designing the little triangles in Photoshop, the rest is fairly easy.
Here are the supplies you'll need for the ornament that's shown in the product preview.
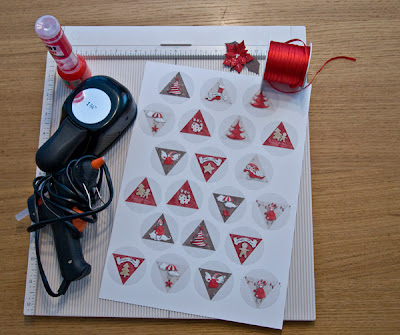
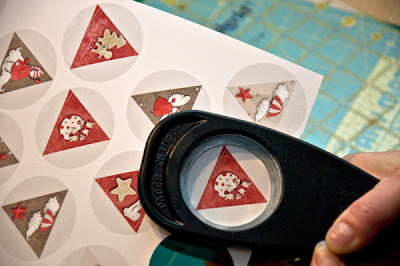
As you can see I intend to cut the circles with a circle punch since trying to cut 20perfect circles is not my idea of fun ;).
So, when designing your circles you should already have an idea which size you want them to be. The first ones I made for this project got discarded in the end, because they were simply too busy and did not look good on the small scale I printed them in. I then went back to the designing table, so to speak, and made a new, much simpler set.
To get circles that have exactly the size of the circle punch you have available is very easy.
For the first one I made I first figured out the zoom factor I had to have in my design software to see exactly the size the circle would print. I brought the ruler up on screen and held another ruler to the screen and zoomed in and out of my canvas until the ruler on my screen exactly matched the one in front of my screen. For my laptop that is 33.33%.
I then started to resize the template until I had a 2 inch circle which I verified again by holding a ruler against my screen at 33.33% zoom.
This year I have learned a little more about Photoshop and will show you another way to get the right size.
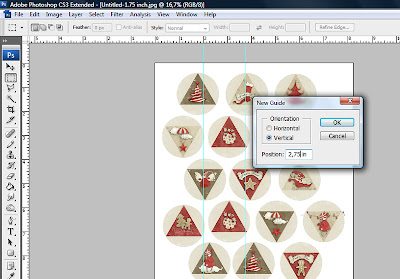
Go to View/New Guide
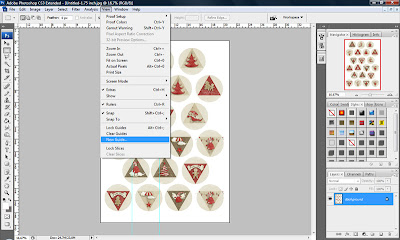
(if you click on the pictures you can see them a bit larger)
You can place this new vertical guide anywhere on your canvas. For my example I placed it at 1 inch.
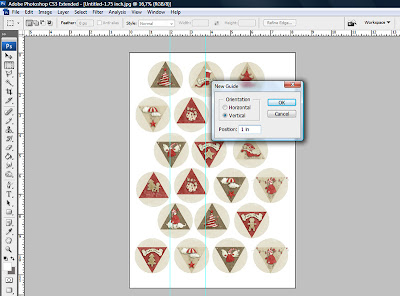
I then went to View/ New Guide again and this time I placed it at 2.75 inch, because my 2 inch circle punch does not work properly anymore and I wanted to try the next biggest I have, the 1 3/4 inch punch.
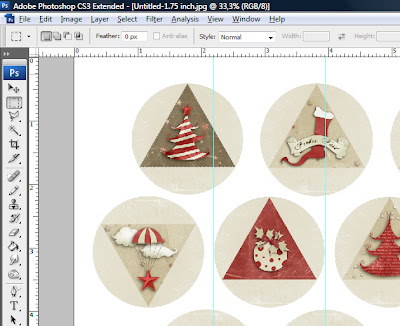
And here is a picture of how I sized my circles to fit exactly between those two guides.
A plus of using a 1 3/4" punch is that you can fit all 20 circles on one sheet of printer paper.
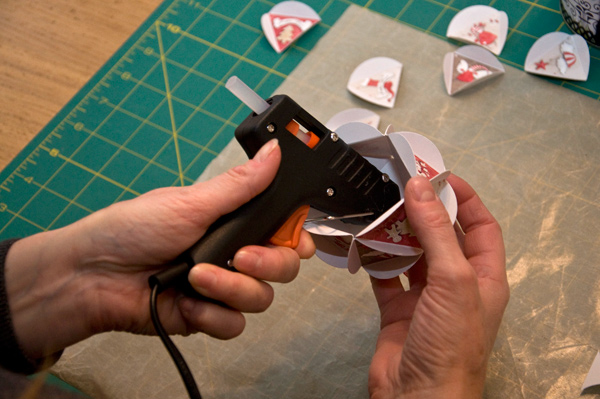
We're now coming to the loudest part: the punching. :)) Hubby does not like the sound too much, especially when he just fell asleep on the couch. *lol
The next step is to score all the lines of the triangle. That's a bit tedious, but absolutely necessary. I have treated myself to a scoring board recently, because I found that was the tool I was longing for most when working on projects, but scoring with the back of a knife along a ruler on a not too hard surface (I used my cutting mat) works just as well and even gives crisper lines.
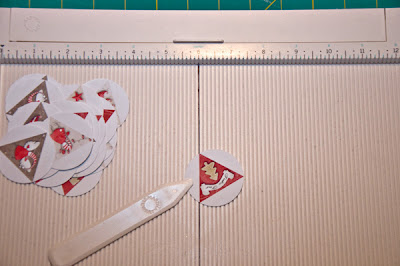
As you can see, I took a black marker down the center line of my board, because there are so many lines that I never was sure I I hat the top of my line and the back of my line still on the same notch. Now I can easily see it.
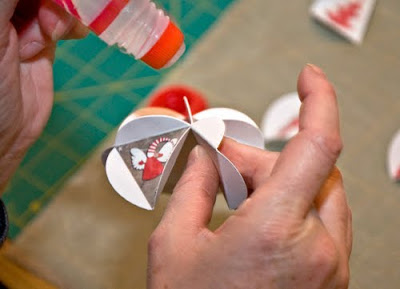
After scoring all 20 circles it is time to get out the glue. I think wet glue applied to the tabs created by the score lines with some kind of brush to get a thin and even coat works best for this project. I was so lucky to find just the perfect glue during our vacation in Hungary. It is wet glue with a sponge tip that only puts a very thin coat on the paper. I guess ModPodge would work pretty well, too. I found that using glue has a lot to do with preferences, so just try your favourite glue on scrap circles and see if it works.
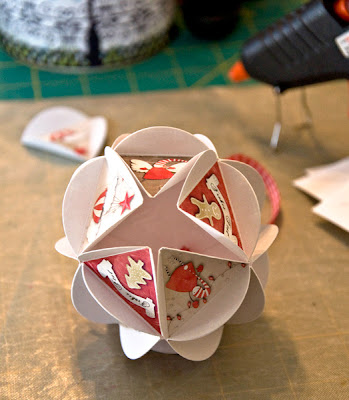
The ornament is put together in three circles or rows. For my ornament I used directional designs and designed 10 'normal' triangles and 10 triangles that stand on their tip. The top is made up of 5 circles with 'normal' triangles.
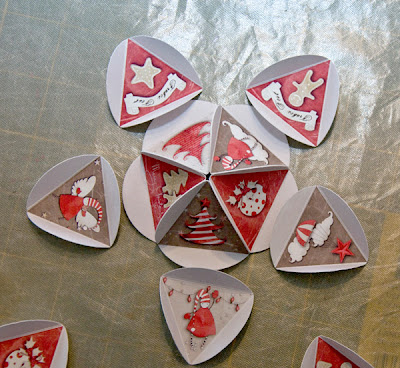
The picture shows the first row of five circles glued together and how 5 triangles standing on their tip go right underneath those. The spaces between the triangles that are standing on the head are filled with 5 'normal' triangles again. The second row of the ball therefore uses 10 triangles (5 'normal', 5 'en pointe').
When all those triangles are glued together at their tabs it looks like this:
Now would be the last opportunity to get the hanger ribbon or twine in there. That's how I did it before remembering that it is easier before the second row is all glued together. This is one of the moments that I don't mind my small hands. ;)
I just stuffed a ribbon through the tiny hole at the top where the 5 triangle points meet and secured it with my hot glue gun from the inside.

I have also used twine on these that I tied to a small piece of wood from a tooth pick which I put inside the ornament and then I threaded the twine through the top hole again.
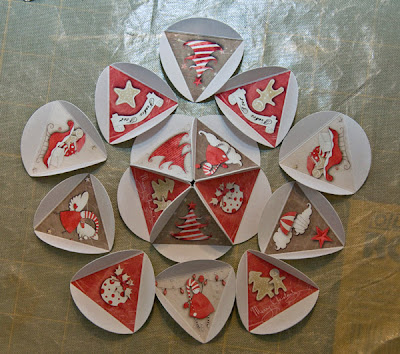
The 5 triangles for the final row are standing on their tip again:
Again, when putting together this example, I remembered too late that I usually kept 1 triangle at the side to put in last. Here I glued all their tops to the last row and then glued all the sides. Worked as well, but I found keeping 1 circle to put in last after glueing everything else together is slightly easier.
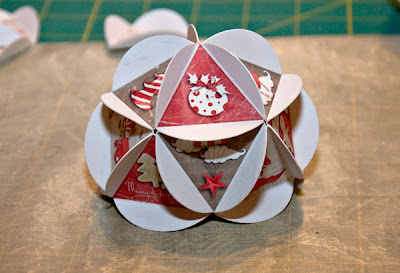
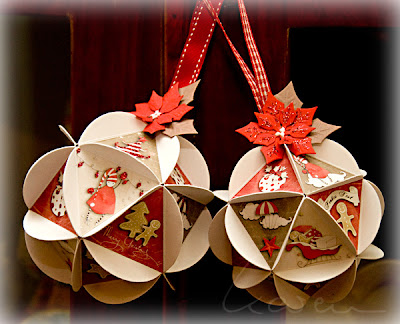
You're almost done now, just add a few embellishments to your liking - or none if you like that better...and Voilà you're done.
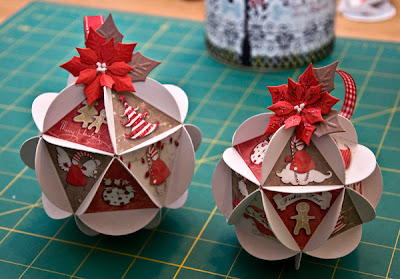
The left ornament was done with 2" circles and measures approx. 4" diameter and the smaller one with 1.75" circles measures approx. 3.5" diameter and has the perfect size for a Christmas tree.
I hope you liked my tutorial and if you feel like you want to try and make an ornament yourself, I would love to see your pictures.
Have a wonderful Thanksgiving weekend everyone!
Karen