Sunday, May 29, 2011

Pin It

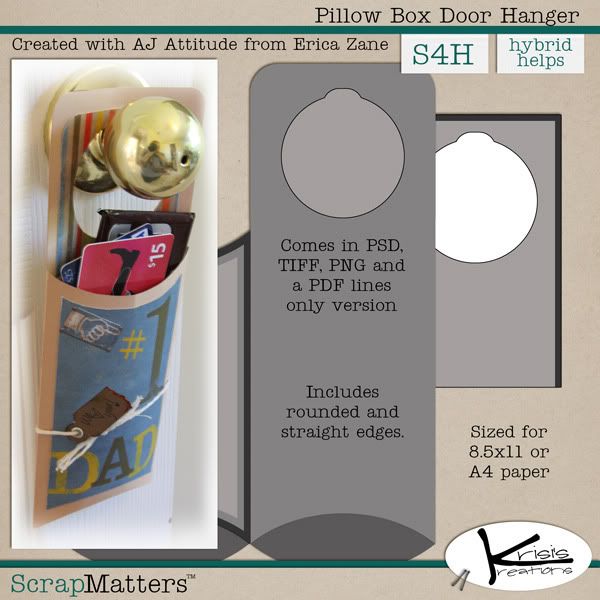
Hi, I am Jennifer, a new member of Krisi’s CT! After I was accepted, I spent even more time going through her store to see which project I wanted to try. It was hard to narrow down, but I finally decided to try the Junior Legal Pad Wrap:


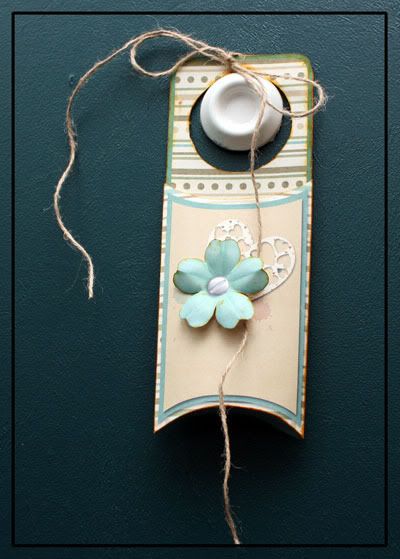
I always like the idea of making something that can be used as a nice gift. I have made similar things using paper and stamps, but to me, one of the advantages to doing hybrid is for projects like this. You can add dimension without adding bulk. Since this is something that will be handled, it is nice to be able to embellish it without worrying about making it too bulky by having things on there that will fall off or get crumpled when someone tries to slip this into their purse or backpack. I also decided to print this off on cardstock. It loses some sharpness that way, but it seemed to make more sense for this project, and make it a little sturdier. I decided to use the inner pocket option, so I ended up with three pages to print:


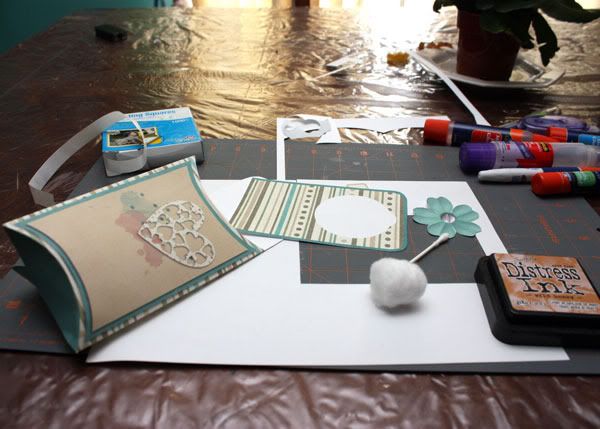
You have choices for the shape of the flap, which is a nice feature of this template. I reduced the opacity of my scoring lines so they wouldn’t shop up very much but I could still see it enough to make my score lines. After printing, I simply cut and scored, and then assembled the holder. I used one of my favorite tools, the Crop-o-dile, to add an eyelet for my ribbon closure. Another easy closure would be a small piece of sticky-back velcro. I didn't think to take photos of the project in progress, but here are the tools I used:


For this project, I used a kit called Catharsis by Sherwood Studio:


I was very happy with the results, and look forward to my next project! Be sure to check out Krisi's store at Scrap Matters for lots of cool projects!

Pin It

Friday, May 27, 2011

Looking Back - Recipe Card Box

Pin It

Hello, everybody!

This is LeAnn, a new member of Krisi's CT.  I can be found as ScaccoGirl over in the gallery and forums at ScrapMatters.  I'm here with today's episode of Looking Back.

Today we'll be taking a look at a project I made using Krisi's "Box it up: 3x5 card box" template:


I decided to go with the food theme of the recipe box and chose Erica Zane's What's Cooking? {the whole batch} kit to go with it:


Only, the finished product will not actually hold recipes.  It's going to hold photos!
Grandma Merry LOVES to have photos of her grandkids,  and I had some pics of her making a pancake breakfast for us the last time we were at her house.  Sounds like the perfect recipe to me! (Hee! Hee!  I love puns!) :)

Here's how it happened:

I chose papers and elements for the box template.  Krisi's template includes "divider" tabs, too, so I chose complementary papers for those.  I saved each piece as a jpg file and took the files to Office Max on a flash drive to have them printed on heavy cardstock.  Their laser printer gives the images a bit of a sheen and makes the project look more professional.  It's nice, but, of course, not necessary, especially since Krisi's templates print on regular letter-size paper.


I wanted to make sure the box was really sturdy, since it was a recipe box, so I found some cardboard backing and glued the cardstock to it.  After the glue dried, I cut around the template and scored the fold lines with a bone folding tool.  I used another piece of cardboard as a guide.


 Then I folded the pieces and glued the front/bottom together and the back/top together.  Because the cardboard was so stiff, I used rubber bands to keep the pieces in place.


When those dried, I glued the two pieces together to complete the box.  I also used a bunch of rubber bands for that step.


After it dried I added a dot of velcro with sticky backing to keep the lid closed.


For the "recipes", I made little 3" x 5" canvases and scrapped layouts of our breakfast fun.


I cut those out, along with the divider tabs, and put them in the box.  Voila!  


[NOTE TO READERS:  Please do not think that, in regards to hybrid, you either "have it" or "you don't", because, in general, hybrid projects are a bit of a trial and error experiment.  Case in point: I glued the cardstock to the cardboard, then cut it, then scored it, and then glued it all together.  Because my cardboard was so thick and stiff, the folded edges of the cardstock sort of "popped" and frayed a little bit on the outside.  Now, it wasn't enough to throw the whole thing out and start over.  I really had two options:  take a bit of glue and smooth the fray, or I could have inked the edges of the box.  I decided to glue down the worst parts of the fray, and let the rest look "antiqued."  In retrospect, I could have cut out the pieces of cardstock and cardboard separately, scored and folded them, and then glued them together, trimming the cardboard layer underneath where it would stick out farther than the top layer of cardstock.  But I went with it, and I love how it turned out!  Don't be afraid to try hybrid because something might go wrong.  If it does - it just adds character! :) ]

I hope you enjoyed this project.  If you have any questions, please feel free to leave a comment here, or PM me in the ScrapMatters forum.

Have a great weekend!
LeAnn

Pin It

Wednesday, May 25, 2011

Pillow Door Hanger

Pin It

Hello Everyone! I am Christina, and I am excited to be on Krisi's Team :)


Today I made a Pillow  Box  Door Hanger. These are so cool and you could use it for any
holiday or just because :) I love these in that you can put things in the front pocket.
Image is linked to the store


Krisi has four different files for you to open in just about any program, PSD, TIFF, PNG's
and PDF's. 

Here is what I have after getting it printed and the supplies I like to use
Once I got it cut it out I decided I wanted to distress it alittle. I think it makes a project look much better and helps cover up boo boo's :)


 I use the distress pad, Q-tip or cotton  ball to apply it to the edges.

Here is my finished project

These are really simple to make and don't take much time. I really loved how it turned out.
You can fill them with a card, notes, gift cards anything you can think of that will
fit.

The flower I printed separate and cut it out. I used Collab For The Love of Boys By Jady Day Studio and Stolen Moments.

Pin It

Monday, May 23, 2011

Card Making

Pin It

Teresa, tpowers in the forums, here to bring you a quick tutorial on card making. I know that when I went digital the one thing I had a hardtime giving up was paper cards. Digital ones always looked a little flat to me in person. After learning some things and picking up tips and a few tools I love to do my cards digital too.
The first thing that I do is make the card in Photoshop. For my example I used Krisi's Sketch it Out-Cards:Sunshine.

Next make a new canvas that is your printing size. I print mine at home so I make a 8.5X11 in canvas. I seperate all of my pieces and arrange them on my canvas. Keep it away from the edges so that everything is the size you expect. I never was a stamper so I merge my font with the layer below it so that it looks stamped on. Here is what mine looked like.

Cut each of you pieces out. I use an exacto knife but, you could use sissors too. I then, inked my edges to add some texture.

Now just add adhesive to the pieces and assemble the card. I use a Xyron but, you can use any scrapbooking adhesive. For the cupcake I use 3D dots because it makes things stick off of the pages. Next, adhere the card front to a piece of coordinating cardstock. I chose a blue. Here is my finished card.

These are the extra tools that I used. None were terribly expensive to purchase. The cutting mat was left from my paper days. I have used an old magazine under my paper when using an exacto knife and it works.

Here are a few more card examples from the templates above. I love that they are so versatile.


For the flower I used Krisi's Create a Flower v1. These are quickly becoming my favorite.
Hope this helped and happy card making.

Pin It

Sunday, May 22, 2011

Happy 2nd Birthday–Mouse Scrappers!

Pin It

Definitely something to celebrate – Mouse Scrappers has been celebrating all month for their 2nd Birthday bash and to close out the celebrations… a big ol’ blog hop!  You should have come from Wendy of WM[squared] designs blog if you are hopping along the Mouse Scrappers blog hop – if not hop on now!

Before I show you the card template I have for you I wanted quickly tell my readers (and blog hoppers) about this great 2 person survival pack (for 72 hours) from Shelf Reliance.  Being prepared is on many peoples minds and right now this kit is more than 50% off! Here is a quick preview of the items – to see the complete list of what is included right here on this blog post.  Regular price $160 – currently available for $79.10 (when you contact me DIRECTLY – via e-mail).  My e-mail is adamandkrisi at gmail dot com or leave a comment and I can get back to you.

Just a reminder for anyone interested in becoming a Shelf Reliance consultant we are looking for team members across the United States AND now in Canada as well!  Send me an e-mail and we can talk about the benefits!

Now for my Mouse Scrappers contribution…

I have created a card template – perfect for creating a birthday card or any other magical opportunity to give a card to someone who needs it.

folder

You can grab it from 4shared.

Before you leave… sign up for my newsletter and get a free hybrid template as well! 

Your next stop on the train is http://riderprider.blogspot.com/ and if you are so tired from all of this partying that you lose your way you can always check out the MouseScrappers 2nd Anniversary Activity forum to get the complete list.  Please be patient if there is nothing posted… we are from all over the world.

Here are a few other items available in my store at ScrapMatters.

4pack

I hope that you have been enjoying the extra projects and tips appearing on the blog.  Please be sure to leave comments letting my CT gals know that you are enjoying their posts.

Pin It

Wednesday, May 18, 2011

Make your own Flower Decorations

Pin It

Hi, everyone. I am Karen from Krisi’s CT. In the forums I usually go under the name of bydelstorp.


Today I want to show you how a recycled glass jar, a little sand or, as in my case, white stones , pretty ribbon and a few printed flowers can make a beautiful decoration for a summer table.


I used a gorgeously grungy paper from Serenity by Happy Scrap Girl Designs


And Krisi's Create it Yourself: Flowers v. 1


For my project I chose the flower at the bottom, which is really pretty and easy to cut out.


And here’s my printed page. I did not have enough to print to fill an entire page so I cut one up into quarters to get photo sized paper that I could put into my printer's photo tray.


As you can see I printed different sizes. I wanted to see how they turned out and then print more, but I then decided that layering the flowers in different sizes would be just perfect. You can also see that one of the flowers is slightly cut off at the edge. I never seem to get the paper perfectly aligned in my printer so I always need to keep an edge around my designs. Here I did not worry about the cut off edge since I wanted my flower to be grungy anyways and did not worry too much about accuracy when I cut them out, makes them more real.
Since I wanted my flower to be a little shabby and grungy, I distressed the edges and crumpled the flowers into little balls after I cut them out.


After straightening them out again I curled the petals around a brush handle to give them more shape. Anything round will work for this. I use whatever falls into my hands first. Chopsticks are great for this as well.


After I liked the shape of the single flowers I glued them together in layers. Again tweaking a bit here and there until I liked the shape, and added a button with twine to the center.
Then I tied some pretty ribbon around a recycled glass jar from the pantry, glued the flower to the bow with a glue dot and voilĂ  I had a custom candle jar that matched the beautiful milk and sugar set that I inherited from my great grandmother.


Thanks for stopping by the blog today and I hope you enjoyed my little tutorial.


Karen

Pin It

Wednesday, May 11, 2011

Using Digi Design Tips in your Hybrid Projects

Pin It

Hi, there! Rebecca here today, one of Krisi's CT members. You can find me in scrap forums and galleries under the name "ReboScraps."

Today, I'm going to share one of my newest projects, and how I used digi design tips when I was creating my project. A couple weeks ago, Liz (mommy22girls) posted tips about color proportions for the ScrapMatters Saturday Special Challenge. The concept is that when choosing colors for your page or project, you use proportions similar to gallons, pints and quarts. The "gallon" will be your primary color, the "quart" is your secondary color, using it about 1/4 (ish) of the amount of your gallon color, and then the "pint" is just touches of a third color.

I used this technique when creating a card. Since the front of a greeting card is basically a 1-dimensional canvas like a scrap page, concepts like this are easy to apply to hybrid projects, and I think a color concept like this would also be helpful for a 3-dimensional project like a box.

So here's my card, which you may have seen in Friday's new release post. My "gallon" is the (mostly) white background, my "quart" is the grey, and my "pints" are the yellow and orange. I like to "scrap" my hybrid pictures in to layouts, so just look at the photo of the card, because I didn't necessarily follow the rules for the page!


This card is made with the Sketch It Out - Cards: Sunshine templates and Write it out: Sunshine word art, both of which are included in Krisi's 2011 NSD Hybrid Grab Bag until today! (Starting Thursday, they will be available separately in her ScrapMatters shop.


Thanks for stopping by the blog today!

Pin It

Monday, May 9, 2011

You can bind your own Notebooks!

Pin It

My mother used to tell me that being poor was the key to creativity. She was half joking, and she definitely said this with a blessed spirit. I could never consider myself poor, having so much to be thankful for. For me I would have to say that thriftiness inspires my creativity. I think I get more excited when I figure out how to do something without spending money, than I get about anything else.

In September of 2010, Krisi asked me if I wanted to guest on her CT team. At that time I was very new to hybrid. I sent her an email to let her know that as far as hybrid went, I was pretty simple. There are some ladies that are so elaborate and detailed and I love their stuff so much. But me, I have ADD and if I can't make it with a few cuts it will just have to be left to someone else. In addition this hybrid thing can be a trap with all the wonderful gadgets you can get. I told Krisi that I didn't even have an official pair of scissors (I was using my kids school scissors), and ask her what did she recommend for scissors. She said she really like the cutting bee scissors by EK Success (though she did warn me they were sharp). So I went to Micheal's that night with my 40 percent off coupon and picked up those scissors and have never looked back. Since then I have added a crop a dile. I use my kitchen paring knife for all my scoring. My husband also has a paper cutter I use often.

The hybrid I am going to do today is something I make often. Because it is so easy. I usually just make little notebooks, but my twin daughters are 10 and the girliness is just oozing out of them so I wanted to jazz up a little notebook for them.

Here is the Krisi template that fit the bill for this girlie goodness.
Of course I needed a kit too. This one was perfect for transforming this template into a notebook for my daughter McKinley to carry around to draw in and color.

And this is what what I made putting them both together.Krisi's design is for an actual purse, but she designs her template in layers so it is easy to adapt them when you need to change things up just a little. I didn't need the sides, but I needed the front, back, and closure. Here is a picture of the printed page and other supplies I needed for the project.The steps are pretty easy.

1. Twist the coil binding out of an old notebook. This is very simple to do, but you may have to bend the wire a little. You just continue to twist it until it is all the way out.


2. Then you just use the original cover as a template to puch holes along the top. If you have a Crop-A-Dile you will be able to do more at a time. I like to use a binder clip when I am doing several at a time. Sometimes I am just making a new personalized cover for an existing notebook. But for this project I just cut my own paper to the size needed for the project.


3. Last you just need to twist your coil binding back through the notebook.

That’s it, your done! This technique is so simple to do! A few year ago I took a project to Kinko’s and they charged me $7 to bind a mini-notebook and they even threw away the binding that they cut off the ends. I asked for it, since while watching them twist the coil in by hand I immediately knew that I would be doing it myself from that point. And they refused! Anyway, now I have my kids twist all the coils out of all their old notebooks!

Here are a few more pictures. I used double sided velcro so she can keep her purse notebook closed.

Hope this helps those budget hybrid-ers out there. Thanks Krisi, for the chance to play with your Evening Purse.

Tamara (tsmspt)

Pin It